
Almost immediately after my first foray with the Raspberry Pi timelapse I was contacted by Cookie Roscoe, who coordinates a weekly farmer’s market for The Stop. The Stop is a community food center here in Toronto, providing lots of programming and emergency food access for lower-income people. My partner, Elizabeth, worked with them for about three years, so I was super happy to try doing a time-lapse of their market.
Here’s the results! Lots of technical stuff about what went into the video after the break!
A decent (but not obscene) amount of thought went into this. Only just yesterday I got the updated firmware for the Pi that lets me control shutter speed and ISO directly from software. As a result, both this and the last time lapse at Elizabeth’s house have lots of flicker, brought on by the automatic exposure settings that were determined with each shot. I put together a bit of software to smooth things out after the pictures were taken.
After many years of messing around with Gimp (the open-source photoshop), it was strangely cathartic to be writing my own image manipulation algorithms. I am relying heavily on the Python Imaging Library for the low-level file interpretation and manipulation; this leaves me free to write short algorithms to do things like adjust brightness and levels. The final version of the video uses three useful effects and a song.
Brightness
Since each photo had its own exposure setting, more or less randomly determined by the Pi, the naively assembled video has quite a lot of flicker. My approach to deal with this was to first load each image individually and create a list of the average brightness of each image, obtained by taking the average value of the image’s histogram. The histogram is easiest to explain for a greyscale image: you have, say, 256 possible shades of grey in your image. The histogram is a list telling you how many pixels have each brightness. This makes it easy to find the average brightness of the image: if the histogram is H, we just sum i*H[i].
For each image, we then find a ‘target brightness’ which is the average of the brightnesses of the twenty pictures on either side of the given image. (This allows the brightness of the image to change as we go from dawn to mid-day.) We then scale the brightness of each pixel in the picture to get close to the target brightness.
Levels
We then adjust the levels. In stats terms, adjusting the brightness is changing the mean value of the picture; adjusting the levels is effectively changing the variance: How wide is the spread of values in the image? It’s best if our image contains both blacks and whites, but most images have some ‘dead space’ at the ends of the histogram where there are very few pixels. I wrote a short algorithm which cuts off at most .5% of the pixels and then stretches the histogram to fill out the color palette. Then we get a good number of black and white pixels, with lots of things in-between.
Pixel-Averaging
Finally, the camera is kind of noisy, and there’s still a good amount of flicker, even after adjusting brightness and levels. So the last step is to steal a good idea from astrophysics and do some pixel averaging. Since the camera is pointing the same direction through the whole shot, it gets many pictures of the same thing. Each pixel is subject to some noise, though: We can eliminate some of the noise and the changes in brightness by averaging a pixel with the pixels in nearby images. In my case, I averaged each image with two images on either side.
Now, this can create some strange effects. Astrophysicists are usually taking pictures of things that stay relatively still: I’m taking pictures of a farmer’s market. If I naively average everything, I get a kind of funny image full of ghosts, like this:

So instead I set a threshold, and say that anything below that threshold is noise, and anything above is probably a person. We still get some strange effects, though, like this person, whose face was apparently a little too close to the color of the floor:
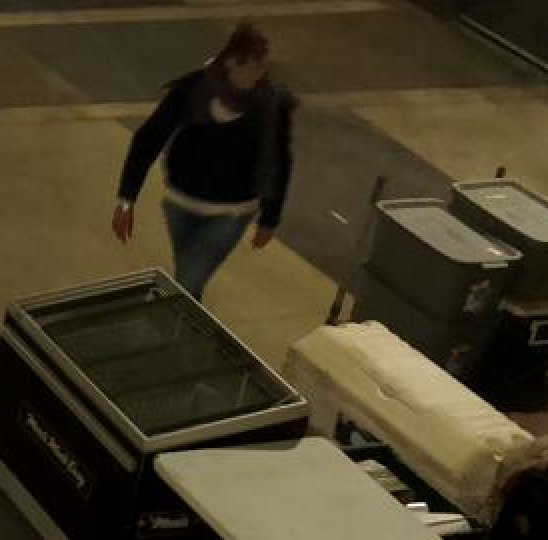
Another funny effect is that sometimes you see shadows (which are typically just a little different from the color of the floor) a frame or two before the actual person arrives. Time stretches out in funny ways. Fortunately, these effects aren’t very apparent at 18 frames per second. They’re much less noticeable than the noise which the pixel-averaging process eliminates, in any case.
In fact, there’s a much more interesting problem to solve here. Better than setting a single threshold for the entire sequence, it would be great to have a threshold that depends on the pixel. For a pixel where there’s lots of action going on, the threshold should be lower. Or maybe we can do away with thresholds all together: the real problem is to decide whether a given pixel in a particular image is in the ‘foregound’ (ie, part of a thing that’s moving around) or the ‘background.’ We should apply averaging to background pixels, but not to foreground pixels. It’s easy to imagine that with some better algorithms, we would be able to see the face in the picture above, while still getting the noise reduction effects on the background. Future work! As it is, the pixel averaging was pretty slow work. I was just using Python (no fast C code for me…), and for the 2300 or so frames in the time lapse, pixel averaging took about 36 hours on a pretty fast computer. I imagine this could be sped up with GPU’s and Cython, but I’m more interested in the underlying algorithms than speed, to be honest.
The total effect of the three changes gives us something like this:

The left side of the image is unedited and the right side of the image has been pixel-averaged, in addition to having its brightness and levels adjusted. If you look closely, you can see that the left side is rougher and noisier; the colors on the right are smoother, and the black is darker. It’s hard to tell in a single part of a single picture, but the image manipulation makes a big difference in the finished video.
Music
Finally, the music in the video is by the electronic musician etc; the song is called ‘bitterfly.’ I found etc through the Free Music Archive, which has a huge collection of music released under creative commons licenses, making them fair to use (with attribution!) in silly video projects. Etc is pretty cool though; I’ve been enjoying listening to their other stuff on the FMA!
